


Changing the IP address on a laptop is not tricky at all. There is more than one way you can change the IP settings of your network. The change of IP address is usually needed in large spaces or organizations, which have few networks. You might also need to change your IP address if your network isn’t working fine with your desired IP address.
Changing IP address mostly occurs when you study in university, college, or work in a corporation. You can’t always work on the same IP address every time because of the change of location or congested networks.
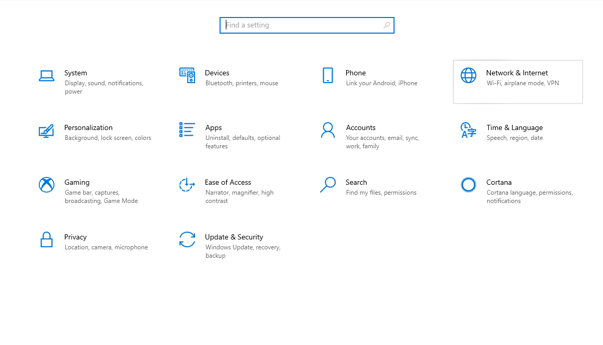
For Windows 10, you can either change your IP address directly from the settings or the Control panel. Not to forget that, in order, to change the IP address, you should be logged in with your Administrator account. There are 2 ways through which you can change the IP address on Windows 10; we are listing all those down below.
Change Settings from Control panel
You can change your IP address directly from the Control Panel. First, you need to open the Control Panel Window, then click the network and internet. From the below options, you have to select ‘View Network Status and Tasks’.
After you click the Network status and tasks, a dialogue box will appear from which you will have to click the ‘Properties’ button. The Properties will show another dialogue box.

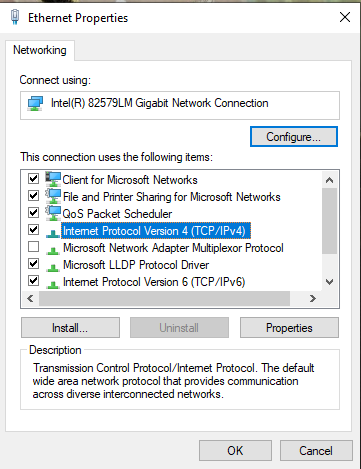
The Properties Window will then show you a couple of options to select from. You have to choose the ‘Internet Protocol Version 4 (TCP/IPv4)’ option from the list.
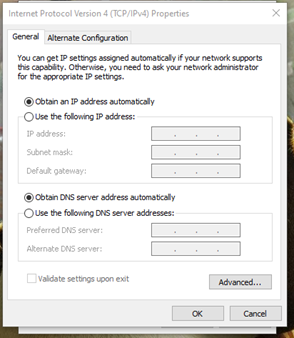
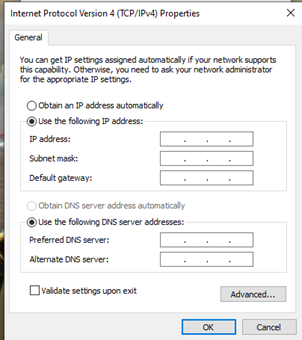
After clicking the Internet Protocol Version 4, or 6, the next Window will provide you the direct options where you can edit the IP address. If you need to update your dynamic IP address which is automatically assigned to Windows, you can click the ‘Obtain the IP address’. If you want the static IP address you can select the option ‘Use the following IP address’.
The Settings App
This is probably the easiest way you can change your IP address with. Just open the Settings app from the Start menu or if you have created a shortcut. From its Window select the ‘Network and Internet’ Option.
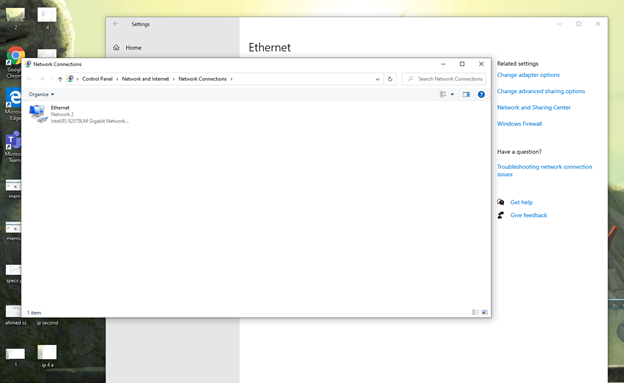
As soon as you click the ‘Network & Internet’ option, the Window will appear from which you can preferably select ‘Ethernet’ from the side panel options, which should open your internet connection setting.

From the Ethernet Window, you have to select the category of ‘Change adapter options’ which are popping on the right side.
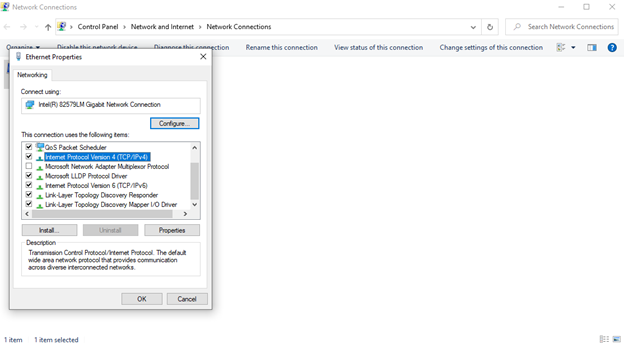
This will open a separate window on your interface, which will display the ethernet folder. Right-click the ‘Ethernet’ and click Properties from the dialogue box.

After Selecting Properties, you will get the same options as we already explained through the Control Panel. You can select the desired Internet protocol version 4 or 6 according to your requirement.
After clicking one of these Internet options, you will get the same dialogue boxes as mentioned earlier. You can change your IP address with two options, either static or dynamic. Go ahead as usual.
Bottom Line
In case you are looking to buy some of the best Core i3 laptops with windows 10, Five Tech UK is a great online destination in the UK. You can get amazing discounts on Windows Pro laptops and others. Many laptops also consist of free Antivirus protection and a one-year license.
Also read about:
5 Best Things To Do In Macau For First Time Visitors
Best Practice to Increase Your Instagram Engagement
A complete guide on developing a ride sharing app and various parameters involved


More Stories
Everything You Need to Know About Motherboards
Difference Between Graphics and Video Card
How to Run Windows Apps on Mac Desktop
1080p VS 4K Monitors Which is better for gaming
Best Laptops for AutoCAD
The Best Computer Speakers in 2021 Complete review