


Netgear Extender Setup
Consider upgrading the WiFi extender to your home? Thank you, you've got the right page! You can read the Netgear Extender step by step instructions. All is set? We're going to get the rolling ball.
The most important thing to do is to maintain a hassle-free expansion framework. The required WiFi range extender setup requirements are given as follows:
In the same room as your home router, put the Netgear Range ext.
The expansion unit should get the right power supply.
A workable WiFi home network is coming next.
One browser on the laptop or tablet can be more than one. If Netgear Extender Page login is not accessible in your web browser, a situation may occur. You could go to a different browser in this situation.
So before setting up a new Netgear range, there were some important items to be remembered. Now let's go on with the instructions on setup. Keep reading. MYWIFIEXT helps to customize your Netgear extender setup.
Netgear Extender Setup Settings Using Mywifiext
You can install the Netgear range extender setup in two ways, the manual, and the WPS operation. Let's talk about both methods, one by one,
Netgear Extender Setup: Manual of operations
This Netgear Extender setup method is also known as the web browser installed. Follow the following points to setup your computer:
How to use the WPS method to set Netgear Range Extender Setup
The easiest way to install Netgear Extender is to have WiFi Safe or WPS enabled. All you have to do is simply go through the following steps.
To begin with, make sure that the extender triggers it.
Look for the WPS button on your mobile phone and keep it down for a while.
Keep WPS on your router or click it.
The LED light turns solid green, which means the extensor is correctly set up by the router
Please repeat the same process for dual-band extenders.
Using the same password as the network on your router, link to the network of the extender.
The default username and password can be found in the WiFi Extender manual.
Your Netgear range ext is now optimized. Link your WiFi devices now in the house or office and provide a smooth Internet connection.
Mywifext local is the page where you can view and install or customize your Netgear Extender Setup
Manual setup for Netgear Extender: No Ethernet port available
Not everyone is equal! Not everyone is equal! For such Netgear extenders, there is no Ethernet port. Users get frustrated and ask for something because of this.
Just one thing we can tell you if you still have the same questions, that is, go through the steps below and finish a new extender setup in minutes without an Ethernet port. No more waiting requires!
Reset default factory settings for your extender.
Next, you can use a Wi-Fi link to the extender.
Subscribe to your computer's web user interface.
When done, the default username and WiFi extender password are prompted.
Follow the installation wizard steps and create a router link.
Link your WiFi-compatible appliances to the extender once again.
Significant problems during the installation process of Netgear WiFi Range Extender Setup
New Netgear Wifi Extender Setup most common problems:
You can't hit MYWIFIEXT locally.
Signal efficiency for WiFi is poor / inappropriate.
The selection of WiFi routers is incomplete or inadequate.
How to change Netgear Range ext's default password.
The extensor's default SSID cannot be linked.
No LEDs before/when extensor setup is flickering.
Setup and setup of the extender port.
You cannot log into the Setup Tab of the Extender.
User Account Lost/forgotten.
You cannot continue to NETGEAR Genie Smart Setup with or without login.
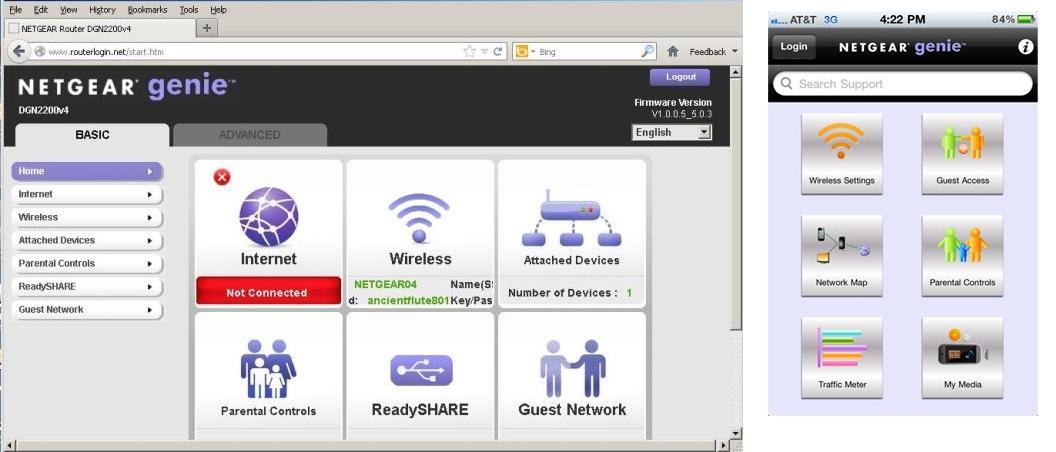
Smart-Get Linked Netgear Genie Setup
When you connect the extender to the Internet and open a web browser window, you can automatically access the Netgear Genie Smart Setup page. That's not always the case, though! Simply open a new window when you start a web browser.
It gives you the following on-screen steps when you interact with the setup wizard
Wireless network connection to Netgear Ext.
Genie will now view a list within the range of current WiFi networks.
Choose the network name you'd like to expand, then press Go.
If the network has a wireless security feature, you must enter your password.
Choose the 5GHz WiFi network and press Continue if you have a double-band router.
You will be asked to change the Wi-Fi settings of an extensor until the extender starts to connect with the router.
For the existing extender Settings, click the Continue button if you don't want to change it.
Now you're going to have a new computer. If this happens, it means that your PC is switched off from the wireless network instantly.
To ensure they are right, check the settings.
Next, link again to your network.
To finish, press the Finish button to close the Genie setup tab.
Smart setup Netgear Genie vs Netgear Genie
The foregoing are the following:
Understand how easy the website contents can be downloaded from your computer
To see how many devices are linked to your network, access the network map
Perform a speed test for your broadband ISP network
Build a guest network for your family and friends
Show and change your current router wireless settings
Create parental controls from your home screen
Get access to various tools for DNS Lookup, Ping, Route, and User Profile
Also read about:
Scrap your vehicle for cash Three reasons you need to tow away your junk car today
Places to travel around the Globe this 2021
A Guide to Applying for GIIS Global Future Ready Merit Scholarship


More Stories
Difference Between Graphics and Video Card
What is Instagram History and marketing
What are Heat Sinks Functions Types More
Security Guide Keeping Your Small Business Safe
How to Run Windows Apps on Mac Desktop
Workstation Advantages and Disadvantages